
Understanding the Basics Shortly
What is a Q&A System?
A Q&A (Question & Answering) system is a tool that takes in questions posed in natural language and provides concise, relevant answers. You can ask any questions and pull any information by inserting the url of that website.
Why Build a Web-Based QA System?
Before we dive into the how-to, let’s consider why you might want to create such a system:
- Efficient information retrieval: Say goodbye to endless scrolling and searching. Get precise answers to your questions instantly.
- Versatile learning tool: Perfect for researchers, students, or anyone looking to quickly grasp the content of a website.
- Customisable knowledge base: Focus on the websites and topics that matter most to you.
- Cost-effective solution: With the right tools and a bit of coding know-how, you can build this system without spending a cent.
According to a recent Stanford University AI Index Report, the use of AI-powered question-answering systems has grown significantly in various sectors, highlighting the increasing value of such tools.
Understanding the Core Technologies
Our QA system relies on two key technologies:
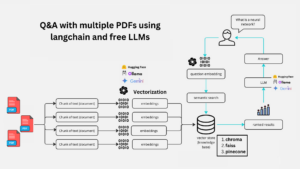
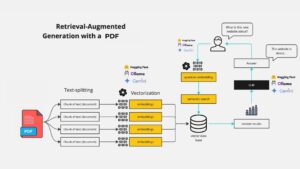
- Retrieval-Augmented Generation (RAG): This method combines information retrieval with text generation. It’s like having a smart research assistant who can quickly find relevant information and use it to answer your questions.
- Large Language Models (LLMs): These are AI models trained on vast amounts of text data. They can understand and generate human-like text, making them perfect for natural language tasks.
Together, RAG and LLMs create a powerful duo for building intelligent QA systems. A study published in the Journal of Artificial Intelligence Research found that RAG-based systems consistently outperform traditional QA models in terms of accuracy and relevance.
Getting Started: What You’ll Need
Before we jump into the code, here’s what you’ll need to get started:
- Basic Python knowledge
- Familiarity with web development concepts
- A computer with internet access
- Google Cloud account (for accessing Gemini API)
- Enthusiasm for learning
In the next section, we’ll set up our development environment and walk through the code to build our web-based QA system.
Setting Up Your Development Environment
Let’s get your workspace ready for building this exciting project. We’ll be using Python and several key libraries. Here’s how to set everything up:
- First, ensure you have Python installed. If not, download it from the official Python website.
- Create a new directory for your project and navigate to it in your terminal.
Set up a virtual environment (optional but recommended):
python -m venv venv |
source venv/bin/activate# On Windows, use `venv\Scripts\activate`
Create a requirements.txt file manually or use the following command in your terminal. It will create a requirements.txt file automatiacally
pipreqs --encoding=utf8
bs4==0.0.2
langchain==0.2.14
langchain_community==0.2.12
langchain_core==0.2.33
langchain_google_genai==1.0.9
python-dotenv==1.0.1
streamlit==1.36.0
chromadb==0.3.29
- Then, install these requirements:
pip install -r requirements.txt |
Understanding the Code
Now, let’s break down the main components of our web-based QA system. We’ll be using Streamlit for the web interface, LangChain for working with LLMs, and Google’s Gemini model for natural language processing.
1. Importing Required Libraries
import os |
Explanation:
- Importing Modules: The code begins by importing several libraries and modules needed for the application:
- os: For handling environment variables.
- Streamlit (st): A tool to create web apps with Python.
- LangChain: A collection of tools for building AI-powered applications, specifically the QA system.
- BeautifulSoup: A library for extracting data from HTML and XML files, commonly used for web scraping.
- dotenv: For loading environment variables from a .env file.
2. Loading the API Key
load_dotenv() |
Explanation:
- Loading Environment Variables: This command loads the API key (and other secret keys) from a .env file so they can be used in the code securely.
3. Setting Up the Chat Model and Embedding Model
model = ChatGoogleGenerativeAI(model="gemini-1.5-flash") |
Explanation:
- Chat Model: ChatGoogleGenerativeAI is an AI model from Google that generates responses in a conversation.
- Embedding Model: GoogleGenerativeAIEmbeddings creates numerical representations (embeddings) of text data to make it easier to search and retrieve relevant information.
4. Function to Retrieve Data from a Website and Create a Vector Store
def get_vectorstore_from_url(url): |
Explanation:
- Loader: WebBaseLoader is used to fetch the content of a webpage.
- Text Splitting: The content is split into smaller chunks using RecursiveCharacterTextSplitter, making it easier to process and search.
- Vector Store: These chunks are then stored in a Chroma vector store, which is a specialized database for managing and searching through embeddings (the numerical representations of text).
5. Function to Set Up a Contextual Retriever Chain
def get_context_retriever_chain(vector_store): |
Explanation:
- Retriever Chain: This function sets up a chain that retrieves relevant information from the vector store, taking into account the ongoing conversation. It uses the AI model and a predefined prompt to generate appropriate search queries.
6. Function to Create the Conversational Retrieval-Augmented Generation (RAG) Chain
def get_conversational_rag_chain(retriever_chain): |
Explanation:
- RAG Chain: This function creates a more complex chain that not only retrieves relevant documents but also generates a conversational response based on those documents and the user’s query.
7. Function to Get a Response Based on User Input
def get_response(user_input): |
Explanation:
- Generating a Response: This function ties everything together by taking the user’s input, passing it through the RAG chain, and returning the generated response.
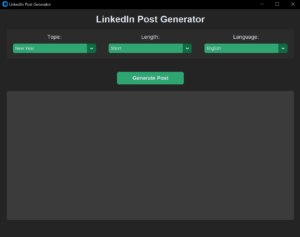
8. Setting Up the Streamlit App
st.set_page_config(page_title="Chat with websites", page_icon="🤖") |
Explanation:
- App Configuration: These lines set up the title and icon for the Streamlit app.
9. Sidebar for URL Input
with st.sidebar: |
Explanation:
- User Input: The sidebar allows the user to input a website URL that the app will use to fetch and process data.
10. Processing the User’s Query
if website_url is None or website_url == "": |
Explanation:
- Checking for a URL: The app checks if the user has entered a website URL. If not, it prompts the user to do so.
- Session State: The app keeps track of the chat history and the vector store (the processed website data) using st.session_state.
- User Query: When the user types a message, the app generates a response using the RAG chain and adds both the user’s input and the AI’s response to the chat history.
- Displaying the Chat: The chat history is displayed in the app, distinguishing between AI and human messages.
Final Thoughts
- Streamlit App: The code creates a simple web app using Streamlit where users can chat with a bot that answers questions based on the content of a specified website.
- AI and Embeddings: The AI uses a sophisticated model to understand the user’s query and retrieve relevant information from the website, providing contextually accurate responses.
This setup is powerful for creating a user-friendly interface that leverages AI to deliver valuable information based on real-time data from the web!
The Full Code
# pip install streamlit langchain lanchain-openai beautifulsoup4 python-dotenv chromadb |
Frequently Asked Questions:
1. What is a Web-Based Q&A System using Google Gemini LLM and RAG?
A Web-Based Q&A System using Google Gemini LLM and Retrieval-Augmented Generation (RAG) is an intelligent app that answers user queries by retrieving relevant information from websites. The system extracts data from a given website and generates contextually accurate answers based on the retrieved content, combining the power of LLMs and RAG for efficient, real-time knowledge retrieval.
2. How does Retrieval-Augmented Generation (RAG) enhance the Q&A system?
RAG enhances Q&A systems by combining two methods: retrieval (finding relevant information from a database or website) and generation (using an AI language model to produce natural language answers). This approach ensures that responses are accurate, context-aware, and based on real-time data, making it ideal for question-answering applications.
3. How to build a free Web-Based Q&A System using Google Gemini LLM and RAG?
You can build a free Q&A system using Google Gemini LLM and RAG by following a step-by-step guide. Start by extracting content from a website, splitting it into chunks, storing the data in a vector database, and integrating it with LLM and RAG models to generate conversational responses. My GitHub repository contains the full script for building this system.
4. Why should you use a Q&A system based on Google Gemini LLM?
Using a Google Gemini LLM-based Q&A system offers several advantages:
- High accuracy: Gemini LLM is capable of generating accurate and context-rich answers.
- Real-time data: Integrating with RAG allows the system to pull in real-time data from websites.
- User-friendly: It’s free to use and can be easily deployed on platforms like Render.com.
- Scalable: The system can handle both simple and complex queries across different domains.
5. What are the benefits of deploying a Q&A system on Render.com?
Deploying a Q&A system on Render.com offers multiple benefits, including:
- Free hosting: Render.com provides a cost-effective solution with free deployment options.
- Scalability: Render.com handles scaling automatically based on user traffic, making it a great choice for web-based applications.
- Ease of use: Simple setup and easy integration with tools like Streamlit, making deployment of your app seamless.
6. Can I customize the Q&A system to retrieve data from any website?
Yes, the system is designed to be flexible and customizable. You can input the URL of any website from which you wish to retrieve data. The system uses BeautifulSoup to scrape content and convert it into usable data chunks for the LLM to process and generate answers.
7. What technologies are used in building the Web-Based Q&A system?
This Q&A system is built using the following key technologies:
- Python: For backend development and web scraping.
- LangChain: To manage and interact with the LLM.
- Google Gemini LLM: A powerful language model that generates answers.
- Chroma: Vector storage to manage the retrieved content.
- Streamlit: A framework for deploying the web-based app.
- BeautifulSoup: For extracting and parsing website data.
8. Is the Q&A system completely free to use?
Yes, this Q&A system is completely free to use and deploy. The entire process, from setting up the Google Gemini LLM to deploying on Render.com, involves no costs, making it accessible to anyone interested in AI and LLM technologies.
9. How can I deploy the Web-Based Q&A System on Render.com?
To deploy the system on Render.com, follow these simple steps:
- Clone the GitHub repository.
- Set up your environment variables including the Google API key.
- Run the app locally to test it.
- Deploy the app on Render.com by linking your GitHub repository.
